Raspberry Pi Digital Photo Picture Frame - WiFi Linked
This is a very easy and low cost route to a digital photo frame – with the advantage of adding /removing photos over WiFi via ‘click and drag’ using a (free) file transfer program. It can be powered by the tiny £4.50 Pi Zero. You can also transfer photos direct from a mobile phone (e.g. via ES File Explorer on Android).
This can be a standalone digital picture frame or can be the screensaver for a Pi based system (doing something else) and show pictures when it is not being used. For example, this could be the screensaver for a Pi based media controller or for an interface to my Pi based music and radio player.
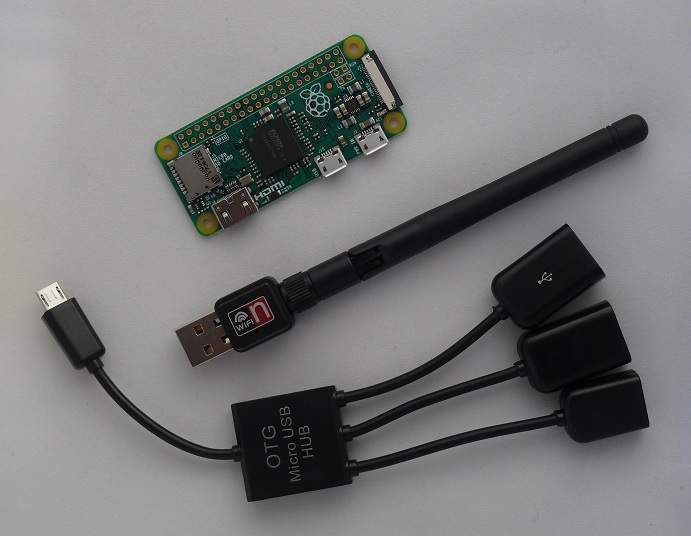
For simplicity and size I have used a Pi Zero here but any of the Pi’s should work. I could have used a ZeroW (WiFi) but for the same cost one can get a Zero plus a 2 port USB hub and use a WiFi dongle to optimise the aerial location.
There is a huge choice for monitors:
- Waveshare do very good monitors for the Pi, including ones with touch screens. A touch screen is not a requirement here but might be useful when this is the screensaver for another application. A downside of these is that the connectors plug into the side – that looks untidy or requires a wide frame to hide.
- Most PC monitors will work. Used ones are available at low cost on ebay. Even new ones are pretty good value. If they don’t have a HDMI input they are very likely to have DVI that can be used via an adaptor or HDMI to DVI lead. I picked up a good condition 22” IPS, full HD (1920x1080) Iiyama touch screen monitor for under £80 delivered.
- Lastly there is the option of re-purposing the screen from a dead laptop. See: instructable This has the big plus of being thin and being able to fit into a real picture frame.
All the software/firmware required is free.
The instructions here should allow a novice (or more experienced) to get this running from scratch.
Parts needed:
- Pi (any)
- SD card(suggest 8GB or greater)
- USB hub
- Wifi Dongle
- Monitor and leads
- Mouse (for setup)
Steps:
- Install Pi firmware
- Attach/install monitor
- Add some photos/pictures
- Set up the screensaver
Text in bold italics has to be entered during the setup and can in most cases be copied and pasted – that saves a load of time.
Install Pi firmware
The system will work from both the full Raspbian Stretch install and from Stretch Lite. The latter uses less memory but the former may be needed if the PI is being used for something else as well. The instructions will cover both. The process will use remote setup of the Pi as in most cases this is easier – and can avoid the need for a keyboard.
First download Raspbian Stretch or Stretch Lite from https://www.raspberrypi.org/downloads/raspbian/
The version available at the time of writing was October 2018 but others should work fine.
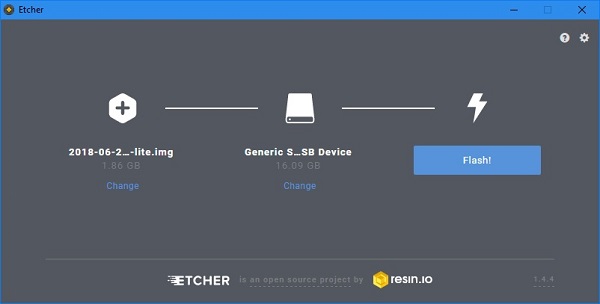
Unzip the file to a known location. Then run Etcher to download the image to an SD card. Etcher is free and downloadable from https://etcher.io/ and is straightforward to run:
After the card has been flashed add a blank file called ‘SSH’ to ‘Boot’. This enables the Pi to be driven remotely and set up from a PC and also to take advantage of copy and paste of the text listed here.
If using a Pi Zero (or ZeroW) we need to get the WiFi working to enable remote setup. This needs the network name and password adding in a specific file. To do this - copy the following into Notepad:
ctrl_interface=DIR=/var/run/wpa_supplicant GROUP=netdev
network={
ssid="YOUR_NETWORK_NAME"
psk="YOUR_PASSWORD"
key_mgmt=WPA-PSK
}
Edit the YOUR_NETWORK_NAME and YOUR_PASSWORD (keep the "") and save to the ‘Boot’ part of the SD card as wpa_supplicant.conf
Eject the card and plug it into the Pi. Also connect the WiFi dongle, if necessary via the USB hub.
Power up the Pi. When it is running find the IP address by logging onto your router. Alternatively, if using the full version of stretch, this can be found by connecting a monitor, mouse and keyboard and click the internet icon at the top right of the desktop. On Stretch Lite (with monitor and keyboard connected) use the instruction sudo ifconfig and look under wlan0>inet addr: . I find the router option by far the easiest.
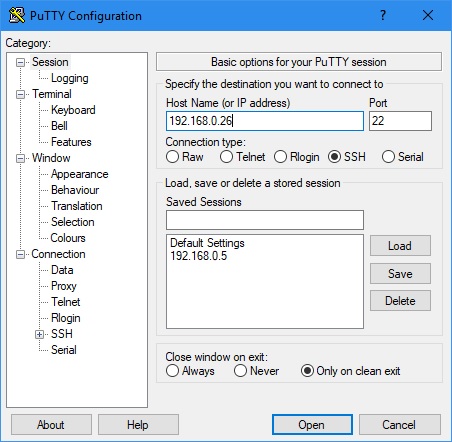
Run Putty (free download from https://www.chiark.greenend.org.uk/~sgtatham/putty/latest.html ) from a PC and enter the Pi’s IP address.
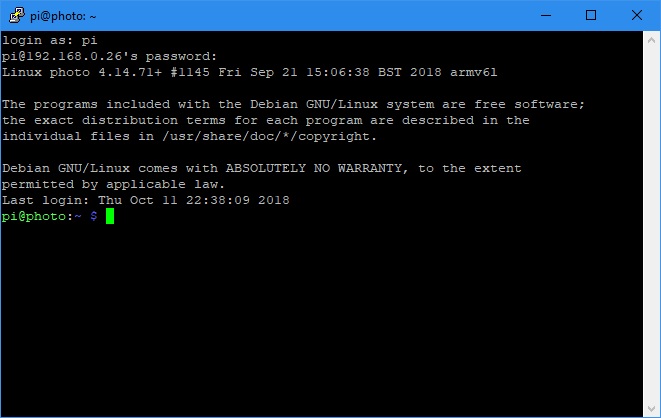
Log on as ‘pi’ with password ‘raspberry’.
First revise the password and other settings via:
sudo raspi-config
(copy text then right click in Putty to paste)
First change the password
I then change the network name (optional)
Under localisation set the WiFi country.
Under Interfacing options enable SSH.
Then right arrow twice and click Finish, and Yes to reboot. This will lose the Putty connection. Rather than close this, wait a minute for the Pi to restart and the right click the Putty task bar and select ‘Restart Session’. Now log in using ‘pi’ and the new password. If the WiFi does not reconnect then unplug the dongle and plug in again. I suspected this was happening but I might have just been impatient for the Zero to boot up!
Next update by entering:
sudo apt-get -y update
Then upgrade entering:
sudo apt-get -y upgrade
This can take a while.
If starting from the full Raspbian Stretch then proceed to the next step.
For Raspbian Stretch Lite we need to add the desktop.
So enter:
sudo apt install raspberrypi-ui-mods
followed by
Y
when prompted.
This is quite a big install and so will take a while…….
Keep the Putty session open and move on to installing the monitor.
Attach/install monitor
I wanted the pi to start without requiring user and password entering so (still via the Putty session):
sudo raspi-config
Select 'Boot Options' then 'Desktop / CLI' then 'Desktop Autologin'. Then right arrow twice and Finish and reboot.
Standard monitors will communicate their settings and hence all one needs to do is shutdown, attach the monitor via HDMI lead (and USB for touch screens) and restart.
The Waveshare monitors need the Pi setting to the appropriate resolution. This needs editing of the config file. So:
sudo nano /boot/config.txt
For the Waveshare 7” and 10” (1024x600) monitor add the following lines (or uncomment/edit existing):
max_usb_current=1
hdmi_cvt 1024 600 60 6 0 0 0
hdmi_group=2
hdmi_mode=87
hdmi_drive=1
For the Waveshare 10” (1280x800) monitor
Add or change lines to:
max_usb_current=1
hdmi_cvt 1280 800 60 6 0 0 0
hdmi_group=2
hdmi_mode=87
hdmi_drive=1
Now shutdown, connect the monitor and power up again. The Pi should boot into the desktop.
Add some photos/pictures
Before sorting out the screensaver we need to load some pictures/photographs. This is very easy using a file transfer program such as File Zilla.
To use FileZilla enter the Pi IP address in Host, then username (pi) and password, and Port 22 and then click Quickconnect. In future these settings are remembered and can be selected from the Quickconnect sub menu. One still has to enter the password when prompted.
When connected the right hand pane shows the Pi files and the left pane the PC files. Find your photos folder on your PC to show the photos and navigate to /home/pi on the pi – when you should see a Pictures folder. If it is not there then create it (right click and Create Directory). Now click and drag the photos you want from your PC to the Pi Pictures folder. Double click on the Pictures folder to check they are there.
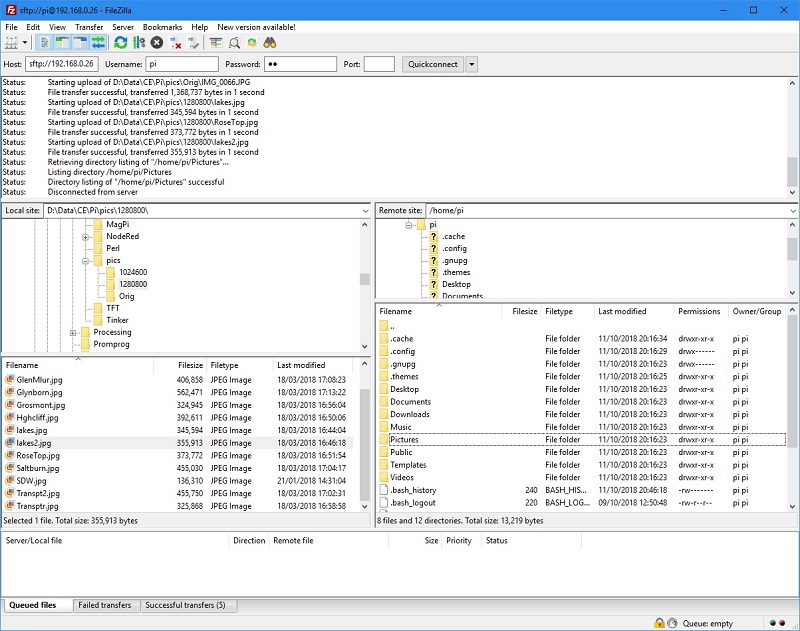
File Zilla makes easy work of updating the photos on the pi. Note that the photos do not have to be the same resolution as monitor. However if they are (or at least the same aspect ratio) they will show full screen without any cropping/ black borders.
Set up the screensaver
At this point on my Stretch Lite load the screensaver had already started with the default collection of screensavers. There is a huge collection of different screensavers to select from. Several show photographs. However I just wanted a screensaver to scroll through the photos. There is one that does this called GLSlideshow.
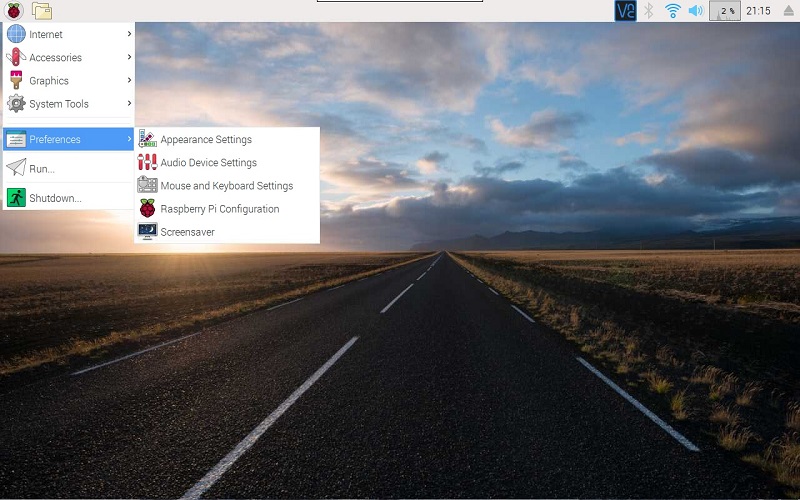
To set the screensavers click the raspberry (top left) then 'Preferences' then 'Screensaver'.
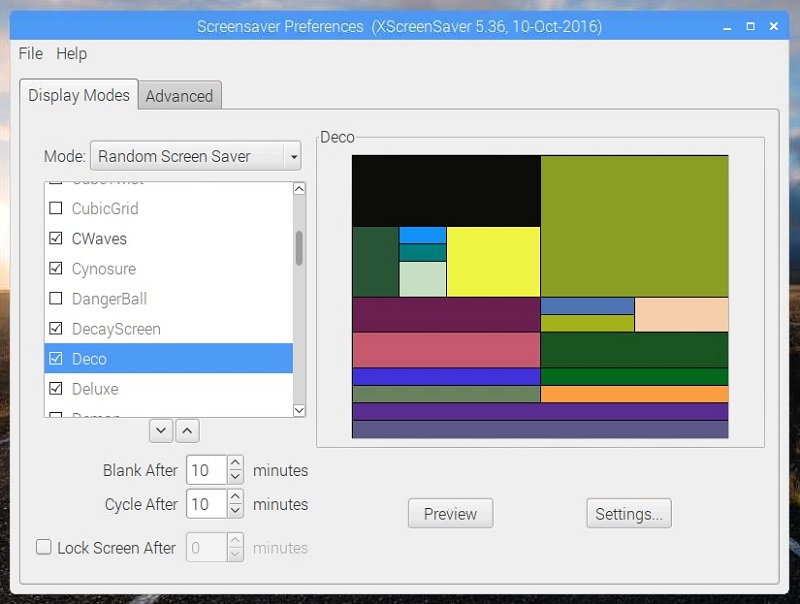
The default has several screensavers selected to run randomly. However not all are installed (greyed out), especially with the install from Stretch Lite.
If GLSlideshow is not installed it can be via a Putty session:
sudo apt-get -y install xscreensaver-gl-extra
On the Pi go to the Screensaver screen and check that GLSlideshow is now there.
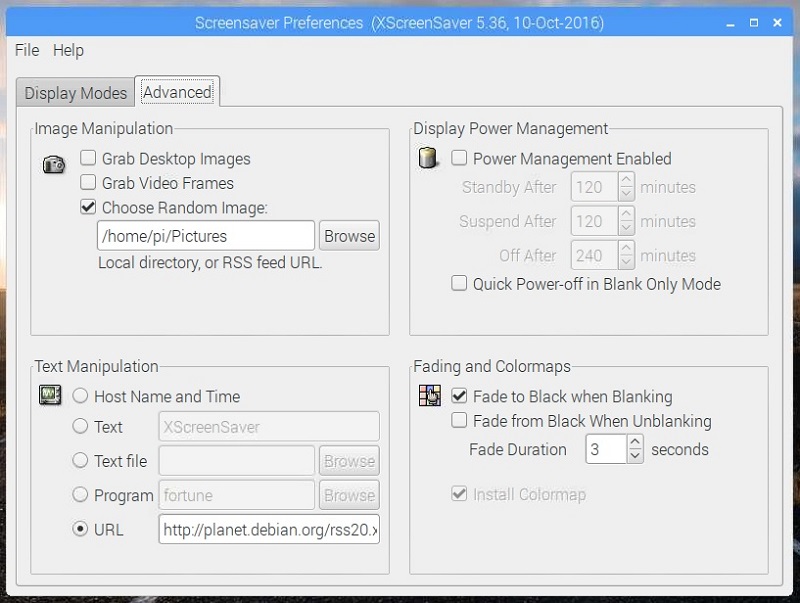
Then click the Advanced tab to tell xsceensaver where to get images. Under ‘Image Manipulation’ tick ‘Choose Random image’ and browse for the /home/pi/Pictures directory:
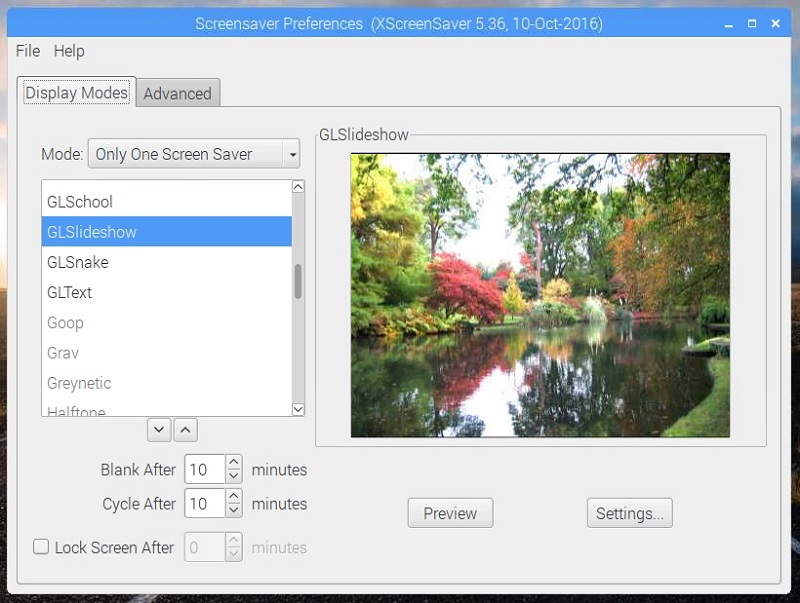
Then go back to the 'Display Modes' tab and change the 'Mode' to 'Only One Screen Saver' and highlight 'GLSlideshow':
Clicking the Settings button gives more options such as update time. The pan and zoom does not function on the pi (needs more processing power).
Lastly set the ‘Blank After’ time to the minimum of 1 minute if using as a digital picture frame.
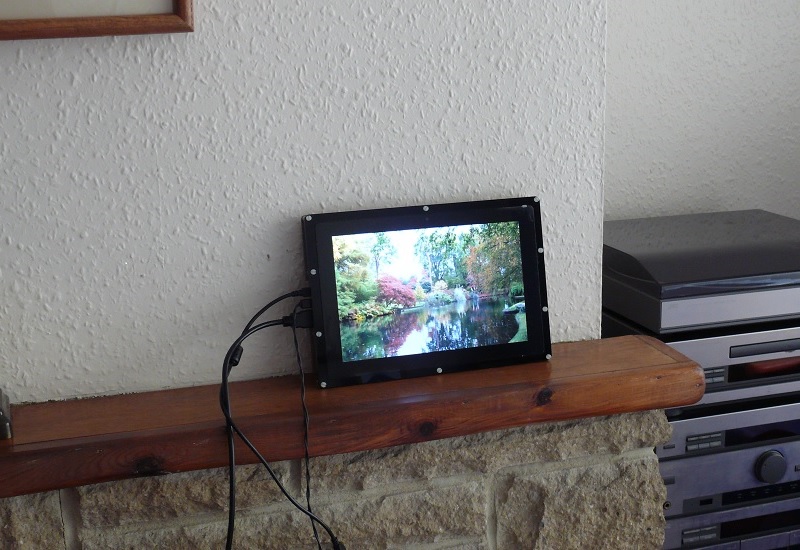
The 10" Waveshare monitor is nice - and larger than many commercial systems.
However the 22" iiyama is simply stunning.
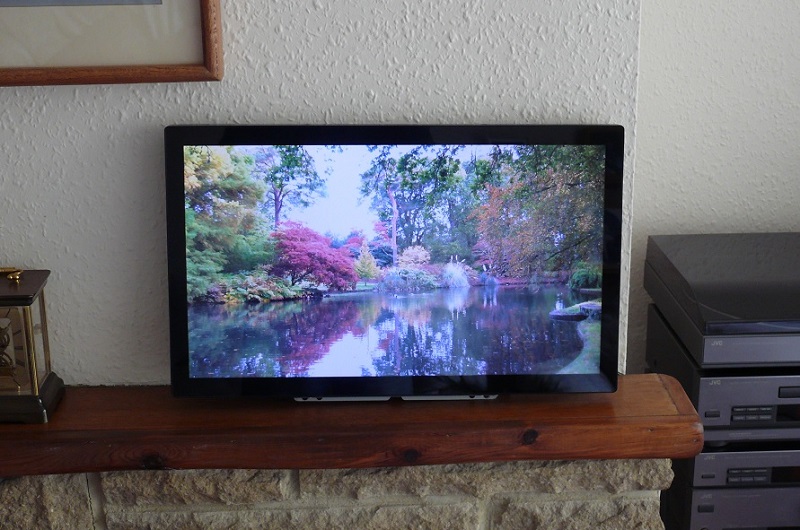
It is time now to sit back and enjoy your photo slideshow.
Mike